Tuesday, August 31, 2010

Sexy, Silky Bittersweet Chocolate Cake with Raspberry Sauce (Part 1: Cake)

Rarely will you hear me describe food as "sexy". It's one of those words that I feel food writers use when they can't think of a better description (I know I'm horribly guilty of it on this blog.) Words like "rich", "explosive", and "breathtaking".

But I have to say it. This cake is sexy.

It's dark and deep. It's sweet and rich. It's fine by itself or with accompaniments. It's aesthetically pleasing and you're always left wanting more. You'll want to introduce it to your friends and family right away. And then after they've met it and they go home, you'll take it to your bedroom for some private one-on-one time.

It's not even really a cake. It's as much like cake as cheesecake is to cake. It's more akin to a pudding, brownies, or even fudge. One bite of this and it will be a while before you can go back to everyday chocolate cake.

And it's only four ingredients. Can't beat that.

This cake uses bittersweet chocolate, which is richer than semisweet. You could also use semisweet--but why would you?

Am I the only one who feels like they're in Charlie and the Chocolate Factory while unwrapping a big bar of baking chocolate? 

The chocolate is melted with butter--again, a heavenly, or, dare I say, sexy?--combination. You can melt them in a double boiler on the stove or in the microwave. Our kitchen was, um, a tad messy, so I went the microwave route.

If you use the microwave, be sure to heat your butter and chocolate in short bursts (15-30 seconds at a time, and then stir.) If you let the microwave work on the chocolate for too long, you'll end up with a grainy, burned mess. So 15 seconds, stir, 15 seconds, stir, and so on until melted. My butter was fresh from the freezer so it took about a minute and a half for everything to come together.

Silky smooth.
I was going for extra decadence, so I used vanilla sugar.

Vanilla sugar is incredibly easy to make, and a great way to get more flavor for a vanilla bean (which aren't always cheap to buy.) After scraping the caviar from the pod for whatever recipe you may be using it for, the leftover pod can be added to plain sugar. In a short period of time, the sugar will be infused with the vanilla flavor and little specks of vanilla throughout.

As you saw with my Vanilla Bean Frosting, I like to use vanilla paste rather than a whole vanilla bean to get those little black flecks of flavor. So instead of recycling my vanilla bean, I tend to just use a whole fresh bean and add the caviar straight to the sugar. It works either way.

I love my coffee with some half and half and a nice spoonful of vanilla sugar. So good.

Crack five room temperature eggs into a bowl and whisk them together with the sugar.

Yes, that is not a whisk in the picture. We were in a hurry and I was scrambling to throw this together. I thought I could get away with not whisking. This meant my eggs were not thoroughly broken up. Which resulted in small ribbons of cooked egg throughout my cakes.

Don't be like me. Do as I say, not as I do. Use a whisk.

 Pour your (whisked!) egg mixture into the chocolate, stir everything together, and admire your beautiful batter.

Next, you'll want to get your cooking vessel ready. I intended on making this cake in a full-sized springform pan. Then I discovered that time (and the dishwasher) has not been kind. My pan was ruined and I had to throw it out. But luckily I had backup--mini pans!

Yes, they are two different sizes. I didn't buy them all at the same time. I bought two and then realized that a whole cheesecake recipe makes way more cheesecake than two little springform pans can hold. So I bought two more. That turned out to be the perfect number for a full-sized cake recipe.

Melt the butter leftover from the chocolate (there should be a couple tablespoons left) and use it to grease your pans. My pans nonstick and basically brand-new, so there's little risk they would stick...but better safe than sorry.

No use going to all that work and then having your cake break in half when you release the springform sides.
Dust your now-buttered pans with cocoa. I used natural high-fat cocoa from Penzey's. The package says it's the richest grade of cocoa, and from the way it smells I wouldn't be surprised.
All greased and cocoa-ed.
You can't tell me you wouldn't eat that batter straight up. Just looking at this picture makes me want to dip a wooden spoon into it and take a lick.
Your sexy cake isn't ready to bake yet. It needs to cook gently in a water bath. Otherwise the outsides of the cake will be burned and the middle will be raw.

I wrapped my pans in tinfoil because I wasn't sure if they were waterproof (my big one wasn't and I'd rather be safe than sorry.)

The water should be hot and it should go about halfway up the sides of the pans. If you're wary about holding a pan of hot water, a good tip is to place your pan(s) in the larger pan and set it on the oven's rack. Then, once everything is stable and doesn't require more lifting, the water can get poured in.

This is what the cakes look like halfway through their cooking time.

When the centers are no longer jiggly and you can touch the center without getting any batter on you (and without burning your fingers!), your sexy cake is ready to come out of the bath.

Take them out of their waterbath (carefully!) and remove the tinfoil if you used it.


Once the cake has cooled, you can remove the springform sides and take in all its glory. (Another hint--run a butter knife around the edges of the cake, just to make sure nothing is sticking. Don't scrape, though, or you'll scratch up the nonstick coating.)

You can stop here and admire its overall fudgey cakiness. It would be just fine as is--although, I have to say, a little rich. To cut through the richness, you could dress your cake up in raspberry sauce. But you'll have to wait until tomorrow, when I post the recipe. Think you can hold out?


Recipe: Sexy, Silky Bittersweet Chocolate Cake
10 oz. bittersweet (or semisweet) chocolate, broken into pieces
16 tbsp. (2 sticks minus 2 tbsp.) butter
1 c. granulated sugar
5 eggs, room temperature

2 tbsp. butter, melted
cocoa powder, for dusting

Melt butter and chocolate together, either in a double boiler or in a bowl in the microwave. Let cool slightly.

In a separate bowl, whisk sugar and eggs until eggs are completely incorporated into the sugar.

Mix sugar-and-egg mixture into chocolate.

Brush springform pan with melted butter and then dust with cocoa powder. Pour in cake batter.

Bake at 350 for 1 hour 15 minutes (or, if using mini pans, around 40-45 minutes.) When center is no longer jiggly, cake is done.

Remove from waterbath. Let cool completely and then remove springform sides.

Serve immediately plain or with Raspberry Sauce (recipe to follow.)

Monday, August 30, 2010

Puffed Pancake

Talk about an easy recipe. It's quick, and curbs the cravings for carbs, butter, salt, and sweetness. I'll admit it, I had one of these bad boys before I went to bed last night.

My sister and I used to make these back when we were kids. We had some interesting breakfasts when we were younger--I remember pan-fried hot dogs and frozen chimichangas also being on the list of breakfasts. But meals for kids in the early A.M. were rather limited when your mom didn't buy things like sugar cereal, peanut butter, or white bread.

I still make this pancake whenever I get the urge for something hot and quick. It literally takes 5 minutes to make and another 10 to bake.

All you need is flour, milk, butter, vanilla, and an egg. You barely need to measure.
The very, very first thing you want to do is turn your oven on. The temperature is 450; by the time it's preheated, your pancake will be ready to go in.

Grab an oven-safe pan (nonstick or not, but nonstick seems to work best for these.) Make doubly sure that your pan is oven-safe, though. Don't want melted plastic from the handle to get inside your oven. Let the pan preheat inside the oven along with your butter.

Now onto the batter. There's no sifting, beating, separating, nothing. Just put everything into a bowl and stir.
Once everything is whisked together, pull your pan out of the oven (use an oven mitt if you like the skin on your hand!). Make sure the butter is coating every inside surface of the pan.

Now just set it in the oven and walk away. Go do something else. Make some coffee. Feed the kids. Let the dogs out. Because you don't want to look inside the oven. It's a puffed pancake, after all.

Okay. Because I love you, I'll show you what it looks like, halfway through. So you can resist the temptation of looking when you make your own.

And because I had the oven open for so incredibly long in order to capture that single picture, my pancake failed to rise up the sides of the pan. Oops.

I don't even care. It still tasted amazing. I like to top mine simply, with some jam or jelly. You could butter it, syrup it, dust it with powdered sugar, or serve it with fresh fruit. You could make it savory by adding sausage or bacon, or serving it in place of a tortilla for tacos. Ooh, you could cook the bacon or sausage in the pan and use the drippings instead of butter. Then you could pour the batter over the top and top it with scrambled eggs when the pancake comes out of the oven. Yum.


Recipe: Puffed Pancake
This makes enough for one person and can be made in an 8 or 10 inch pan. It can be easily doubled in a 10 inch pan with no trouble. The amount of butter can stay the same.
1/2 c. flour
1/2 c. milk
1 tsp. vanilla
1 egg
2 tbsp. butter

Preheat oven to 450F. Put butter into oven-safe skillet and place the skillet inside the oven while you prepare the batter.

Mix the flour, milk, vanilla, and egg together.

Once oven is preheated, carefully pull out the pan and swirl butter so all of the pan's surface is coated. Carefully pour in the pancake mix.

Bake for 10-15 minutes until pancake is golden brown and puffy. Serve immediately.


P.S. If you haven't noticed, there's a new page linked to Kim Chee Casserole, in the upper left-hand corner called Recipes At A Glance. It's simply a list of all the recipes I've posted so far, sorted into subject so they're easy to find.

I wanted to add a feature with thumbnail images that led to the different links too but have yet to find a photo editing program that works for me. It might be a while. ;)

Sunday, August 29, 2010

My Favorite Thing This Week--My Readers!

This week, my favorite thing is my blog readers! Thank you for supporting the blog--whether it be by becoming a follower, or by telling others about it, or by simply checking in once in a while to read or leave a comment. I hope you've enjoyed Kim Chee Casserole so far, and that you continue to do so!

The question to be answered to enter the contest was:

Question: What has been your favorite recipe posted on Kim Chee Casserole so far?

The registered blog follower who was chosen at random by my super high-tech randomizing system was:
 
So congratulations, Tina! You're the first Kim Chee Casserole winner! Contact me at imperialhighness@hotmail.com with your address and whether you want the green or black Kuhn Rikon knife.
 
Thanks to everyone for playing!

Thursday, August 26, 2010

The First Kim Chee Casserole Contest!

Okay, folks, it's finally time for the very first Kim Chee Casserole contest! It's just my way of showing you delightful readers how much I appreciate your continued support. It's been a great first month, with hopefully many more to come!

That's right, folks. One lucky winner will win this starter set that includes one Kuhn Rikon paring knife, one Totally Bamboo cutting board, and a pretty plaid hand towel by Primitive Artisan!

These Kuhn Rikon knives are amazing. They're super sharp and come in equally sharp colors (the winner will get to choose between lime green and black.) And, if you're anything like me, you can always use more cutting boards and kitchen towels.


Here's how you can enter the contest. Become a follower of the blog (instructions are here). Then leave an answer to this question below in the comments section.

Question: What has been your favorite recipe posted on Kim Chee Casserole so far?

A winner will be chosen at random to win this month's awesome prize. Remember, even international readers are eligable to enter! The contest will close at noon CST on Sunday, August 29. Good luck!

Wednesday, August 25, 2010

Brined and Grilled Pork Chops

Pork chops are a great crowd-pleasing meal. I don't know anyone (apart from those who don't eat pork for religious reasons) who doesn't like a good pork chop.

Yumm.
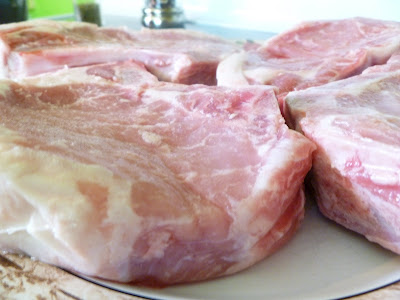
There are millions of ways to prepare pork chops. They can be thin, little quarter-inch thick pieces of meat, great for stir-fries and pork sandwiches. They can be two-inch-thick monsters, perfect for stuffing or glazing with a sweet sauce. This month, I was given four thick, bone-in chops with our CSA package, and, on advice from the farm owners, decided to brine and grill my meat.


Brining is a great technique. It's an easy way to add both flavor and moisture into whatever meat you're preparing. I've never had brined meat that ended up dry and overcooked. And it's easy--I think a lot of people are hesitant to brine because they think it's complex. But nothing could be further from the truth!

This easy brine starts out with everyday ingredients. Salt, brown sugar, mustard, vinegar, garlic, red pepper flakes, and gently crushed juniper berries are combined with water to make a simple yet flavorful brine.

But really, you could just use water, salt, and a pinch of sugar if that was all you had. A simple brine recipe would call for 1 tablespoon of salt per 1 cup of water.
Dump everything into a pot and throw it on the stove. You'll want to heat the water to boiling.
While you're waiting for your pot to boil, get friendly with your chops. Admire their smooth musculature. Take in their pinkish hue. Imagine what they'd look like after a hot, steaming herbal bath.
:::ahem::: Because, uh, the bath is ready!
But you don't want to put your chops straight into the boiling water. I love pork chops but boiled is not my preparation of choice. So it's time to cool things down a little. I added an entire tray of ice cubes, as well as a cup of very, very cold water.
Once the marinade has cooled, you can let your chops go for a swim. You can let them soak for as short as an hour or as long as a day. I would have let mine brine overnight, but I didn't plan ahead so they only got an hour or two. They still ended up moist and delicious. I can only imagine if they'd had a few more hours of their salt soak.

The trick with brining is to soak your meat in a nonreactive pan. I used stainless steel, but if I had brined the chops overnight I probably would have used a glass bowl or a plastic Ziploc bag. Do not use aluminum or copper. Your brine (and meat) will end up with a metallic flavor.

When you're ready to cook your meat, remove it from the brine and pat dry. You won't get that nice, charred crust from the grill with wet meat. Plus the towels soak up the excess brine and prevent the chops from being too salty.


Show your meat some love by slathering it with oil.
 
I think it's kind of funny that the paper towels left a pattern behind on the meat.
 
Give your meat a good grind of pepper (both sides, please!) There's no need for salt--there was plenty of that in the brine.

I also like to bring the meat to room temperature. This prevents the meat from shrinking when you cook it.
 
Grill the chops over medium heat for 5-6 minutes a side.
 
If your grill flares up, move the chops off the direct heat until the flames die down. Or just stand there and admire the light show. You can pretend later that you meant for the outsides to be black.
Let your meat rest for at least 5 minutes after taking it off the grill. Try not to grab it with your bare hands. Especially try not to growl at the other dinner guests when they try to grab a pork chop for themselves. Do not fight the dog over the bone after dinner.
 
I was civilized tonight and used a knife and fork. ;)
 
Recipe: Brined and Grilled Pork Chops
4 1" thick pork chops (bone in, if you can find them!)
 
4 cups water
6 tbsp. salt
1/4 c. brown sugar
1/2 c. vinegar (I typically would use cider vinegar, but we were out, so I substituted white wine instead)
2 cloves of garlic
2 tbsp. dijon mustard
1 tbsp. juniper berries
1 tsp. crushed red pepper flakes
 
1 c. cold water
1 ice cube tray's worth of ice cubes
 
olive oil
salt and pepper, to taste
 
Combine water, vinegar, brown sugar, garlic, mustard, and juniper berries in nonreactive pan. Heat until brine solution boils.
 
Take solution off of heat and add cold water and ice cubes. Don't skip this step--the liquid from the ice cubes and water is essential to get the right ratio of water to salt.n
 
When solution has cooled, add pork chops. Allow to marinate for at least one hour and ideally overnight.
 
When ready to cook chops, remove from brine and pat dry. Drizzle both sides with oil and season with pepper.
 
Grill over medium heat, 5-6 minutes a side. Allow to rest before serving.

Tuesday, August 24, 2010

Fresh Tomato Salsa


 Tomatoes have come into season and now's the best time to take advantage of them! 

I used to think I didn't like tomatoes. As a kid, I didn't even like ketchup that much, and I thought it was always rather bizarre when my relatives would cut a thick slice of tomato, sprinkled lightly with salt and pepper, and dig in like it was a juicy ribeye. It was even weirder when they seasoned it with sugar or simply bit into it like it was an apple. What was that about?

But then I got older and I realized that you can make incredibly delightful dishes with fresh tomatoes. Pale, out-of-season tomatoes that fast food restaurants put on burgers just can't compare to the fresh acidity of a garden-grown tomato. 

It's amazing the things you like as an adult that you found repulsive as a kid, isn't it? I think every adult should try a dish they disliked as a child. But a grown-up version made with fresh ingredients--no processed food allowed. My husband thought he hated scalloped potatoes. He'd grown up on the "just add water" type made from freeze-dried potatoes, dry bits of "meat", and powdered milk. Then he had scalloped potatoes made from milk and fresh potatoes, with chunks of real ham, and he decided that scalloped potatoes weren't so bad after all.

There are two things I like to make when given a pile of fresh tomatoes--caprese salad and fresh salsa. Because I was in the mood for some spice, I went the salsa route.

Look at these beauties. Isn't it incredible the many colors food can come in?
I like to halve them first. They look so pretty inside.
Then I dice them into a small, colorful mountain.
The next four ingredients are as important to salsa as the tomatoes. 

I send half an onion and two garlic cloves through the food processor. I promise, I do chop vegetables myself! I happened to make this on a day that I was making something else that needed the food processor for onions and garlic, too, and ended up tossing in enough to make both recipes. Rachael Ray uses the "use twice, chop once" rule, so why can't I?
Next, I halve and seed a jalapeno. You don't need to seed it if you like heat, but I find that it's sort of hit-or-miss on the heat level of these, and I'd rather add head (through hot sauce or more pepper) rather than having it be way too spicy to start out with.
Mince it up. If you wear contact lenses, I'd recommend using plastic gloves. It takes a long time for your eyes to stop stinging after you touch them with jalapeno fingers. Once I cut my finger while working with hot peppers and I couldn't sleep that night; the cut stung that much, and even after washing my hands dozens of times and soaking my hand in a glass of milk, it still burned.
Finally, the fourth ingredient is fresh cilantro. People say they don't like fresh cilantro, and I can't imagine why. It adds a crunchy, fresh, green flavor to this salsa. And it smells like freshly mown grass sprinkled with cracked black pepper.

If you still don't like cilantro, I suppose you could use parsley.

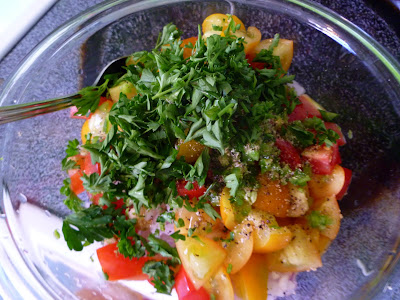
And, for you observant folk, yes, that is parsley in the bowl. I accidentally grabbed parsley instead of cilantro. They were right next to each other and in identical packaging, and I was in a hurry. Sigh. Buying parsley when you mean to get cilantro is one of life's little disappointments. I added a couple shakes of dried cilantro, but it's just no the same. Not by a long shot.

Zest a lime while you're thinking of things that are green. 
Combine everything in a big bowl. Crack some pepper, squeeze the juice out of the lime, and drizzle some olive oil over the top. 

What about salt? you may be asking. 

Well, here's the thing. I don't like to add salt unless the salsa's going to be eaten in its entirety right away. The salt will draw out the water in the tomatoes, leaving you with a puddle at the bottom of your bowl and slightly mealy tomatoes. Just make sure you buy salted chips, or eat the salsa in one sitting if you do choose to salt it.

In the blink of an eye, you've made a bowl full of the best fresh salsa you've ever tasted. There's no recipe posted for this because salsa is one of those "personal preference" recipes. Some people don't like onions or garlic. Others will want it super spicy. If you want to add some roasted flavor, you could roast some of the tomatoes, garlic, and jalapeno over the grill or in the oven before adding them. Or, for a milder spice, you could use chipotle in adobo sauce instead of the fresh jalapeno. Make it heartier by dicing up queso fresco or monteray jack cheese. Take this recipe and make it yours. Buy an extra bag of chips to go with it--you'll need it.