Wednesday, September 29, 2010

Buttermilk Pancakes

When I think of pancakes, I think of Sunday mornings. I think of everyone in the kitchen together. I think of wholesomeness and family. But mostly I think I'm hungry.

The Kid loves pancakes. She would eat pancakes every day if that was nutritionally okay. I know one person who tries to go out to breakfast every weekend for pancakes. But why go out when you can make them at home? You don't even have to get dressed. Heck, you can make pancakes in the nude if you want. Just don't tell me about it later.

Pancakes are easy to make and homemade pancakes taste so much better than the ones from a box. Everything here (except maybe the buttermilk) is an ingredient that should be part of your basic pantry staples.

This recipe starts with a very white, very boring-looking bowl of dry ingredients. There's flour, sugar, baking soda, baking powder, and salt here.


I whisk all the dry ingredients together. So much easier than sifting.

Next I get the wet ingredients ready.

This measuring cup holds melted butter, milk, and buttermilk.

Try, if you can, to have the eggs, milk, and buttermilk be room temperature. That way, the melted butter won't re-solidify when you combine them. 

If you can't, that's okay. Your pancakes will still turn out okay.

Pour the wet ingredients into the dry. You'll want to wait to do this until just before you plan on making the pancakes. The longer the batter sits, the less effective the baking powder and baking soda will be, and so your pancakes will be less fluffy.

Crack in two eggs as well.

I just love how the eggs look, framed by the buttermilk. It makes me want to go for a swim.
Whisk everything together until just combined. Don't stir too long or you'll get tough pancakes. Just enough to make sure the dry ingredients are thoroughly wetted.

While you were mixing up your pancakes, your griddle should have been preheating. I have a nifty electric griddle someone gave us for our wedding. It has come in so handy.

The temperature you use will totally depend on your griddle. Ours is perfect at 375F.

Or you could just do the "Grandma Test" and drip some water onto the griddle. If it sizzles, your griddle is ready! 

If you're wondering why the griddle looks kind of dirty, I cooked the bacon and sausage on the griddle before I did the pancakes. Those first few pancakes are so delicious and bad for you I can't even explain it.

Watch your cakes. When they start to puff up and bubble in the middle, they're ready to flip.

If you like flavored pancakes, now would be the time to sprinkle on chocolate chips, blueberries, strawberries, or bananas. 
Flip!

When the middle of the pancake starts to puff up, that means your pancake is done.

Some people make an enormous "blanket" pancake to keep the other pancakes warm underneath. I find an enormous pancake too hard to flip. Our griddle has wells to drain off grease, too, and the batter tends to run that way when you pour too much. We'd probably end up with a bizarrely oval blanket cake. So instead I just put a plate in my oven and set it to around 200F. Pancakes fresh off the griddle go into the oven to stay warm.


When they're done, be sure to serve your cakes with syrup. Real syrup. None of that fake stuff made with high fructose corn syrup. People work hard to make maple syrup. Might as well help them out and appreciate the good stuff!

Recipe: Buttermilk Pancakes

1 1/2 c. flour
2 tbsp. granulated sugar
1 1/2 tsp. baking powder
3/4 tsp. baking soda
1 tsp. salt

3 tbsp. butter, melted
1/4 c. milk, room temperature
1 1/2 c. buttermilk, room temperature

2 eggs, room temperature

Combine dry ingredients; whisk together.

Combine wet ingredients.

Pour wet ingredients into dry ingredients. Crack in eggs. Whisk everything together until just combined.

Cook pancakes on a griddle or in a frying pan. If you're unfamiliar with your griddle, you might need to use a couple pancakes to test, to make sure they get cooked all the way through. My griddle does best at 375F.

When pancakes begin to bubble in the center, flip them over and cook until middles have risen up and griddle-side-down side is golden brown.

Serve with maple syrup, butter, Karo syrup (if you're a grandma--hey, that's what my grandma pours on hers), molasses, cinnamon and sugar, or jam.

Monday, September 27, 2010

Tortilla Soup


I love tortilla soup. It's a little spicy, a little crunchy, a little creamy, and a lot of fun to eat. I love soup, and I love soup with toppings, so tortilla soup fits the bill completely.

Here's today's lineup.

I forgot to photograph the garlic. Pretend there's garlic.

Oh look, here's the garlic! It's magic!

Get the peppers, onions, and garlic sauteeing in some olive oil. You can get your spices ready in the meantime.

Today I used smoked salt, oregano, cumin, and chili powder. Smoked salt's obviously not necessary. Just an extra.

Once the peppers, onions, and garlic are softened, throw in the spices and give everything a good stir.
Time for more color--diced tomatoes, diced chili peppers, and salsa.
It's a soup, so there ought to be broth, too. This is chicken broth.

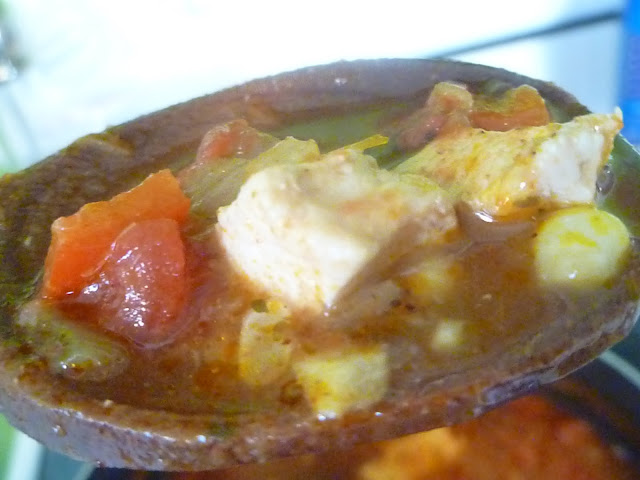
Diced chicken is the protein of the soup. Sometimes I like to add pasta or beans to make it heartier, but I skipped those today.


I did, however, add corn. It's the end of the summer and there's not much time left to enjoy fresh corn.

To remove the kernels from the cob, I like to lay down a towel (to keep the kernels from going everywhere.) Then I set the corn up on its end and cut the corn straight off the cob.

The kernels go right into the soup.

When I'm done cutting the kernels off, I like to use the flat side of the knife to extract the little bits of corn and the corn's milk still left inside. And I add the cob into the soup to add more corn flavor.

The last thing I do is squeeze the juice from half a lime.
The lime gets to soak in the soup, too.

Now, while the chicken and corn are cooking, you can start on your toppings. First (and most important) are the tortillas.

I roll up two or three tortillas and cut them into strips.
Then they get fried in oil. You really don't need much oil at all. This is maybe a half inch.You just want to crisp them up a little.
Fry them until they are golden brown and crisp. Give them a sprinkle of salt right out of the oil.
Now for the rest of the toppings. One of my favorite toppings for tex-mex food is avocado.

Some people are put off by avocado because they don't know how to approach it. But it's really quite easy to work with.
After cutting your avocado in half, gently tap the blade of your knife into the seed. The knife should grab the seed and pop it right out.
Next, score the avocado the long way across. Try to get as close to the avocado's skin as you can--but avoid cutting your own skin!
Now slice the other way. You'll have some nice green cubes when you're done.
Scoop the avocado meat out with a spoon. If you're not going to eat it right away, be sure to toss the meat in something acidic to keep it from browning.

Here are the rest of my soup condiments. Sour cream, cilantro, avocado, shredded cheese, and lime. You could also use some of the leftover salsa.


Don't be afraid to spice up your next meal with this tortilla soup.


Recipe: Tortilla Soup
1/2 onion, diced
1/2 pepper, diced
2 garlic cloves, minced

1 tsp. dried oregano
1/2 tsp. salt
1 1/2 tsp. ground cumin
1 1/2 tsp. chili powder

1 can fire-roasted diced chiles
1 can fire-roasted diced tomatoes
1/2 jar salsa

1 box chicken stock

2 boneless, skinless chicken breasts, diced

1 ear of corn, kernels removed

Juice from 1/2 a lime

Soft tortillas, cut into strips

Vegetable oil

Other toppings (tomatoes, cheese, sour cream, cilantro, avocado, extra salsa, lime, etc.)


Saute onion, peppers, and garlic in some olive oil in a large pan.

When vegetables are softened, add in spices and stir to combine.

Add chiles, tomatoes, and salsa.

Add chicken broth, chicken, corn kernels, lime juice, and lime half.

While soup is cooking, fry tortilla strips in oil until crisp.

When chicken has cooked, serve the soup. Top with fried tortilla strips and other toppings.

Sunday, September 26, 2010

My Favorite Thing This Week

My favorite thing this week is kitchen tools. I love kitchen tools. I can't seem to get out of a cooking store without buying something new (much to my spouse's dismay.) We've got tools secreted all around our kitchen. But many are tools we could live without (ssh, don't tell the hubby!) Below are my favorite kitchen gadgets, the ones that I feel are most important to any kitchen.

First are the very, very basic items.

1. Cutting boards: I think this one goes without saying. It's important to have cutting boards available, unless you like replacing your countertops every few years! I'm actually a big fan of these plastic ones. I know they say that wood boards are the best, and that plastic can carry germs, but they work best for me. They're easy to store, create a good cutting surface, are light enough where I can lift them up and scrape whatever I just cut into the bowl or pot I'm using, and fit in the dishwasher.

Wooden boards can't go in the dishwasher, and we don't have much extra counter space--which is where a dirty board would sit until it could be hand-washed. If you're worried about germs, that's what the sanitize button is for.

(That's not to say I don't own wooden boards, or that I wouldn't love to have one of those big, butcher-block cutting boards, but really, if you're in a small space, on a limited budget, or just don't cook much, these plastic guys are what I'd steer you to.)

2. Measuring tools: I'm covering both the cups and spoons here. When you bake, it's so important to measure things accurately. Your recipe may be screwed up beyond repair if you just "eyeball" how much flour or sugar you need. Make sure you have at least a cup and a half-cup measuring cup, and a tablespoon and a teaspoon measuring spoon.

3. Next are those silicone spatulas. I love these things. I use them all the time. The heads are heat-resistant and dishwasher safe, and they're great tools for both stirring or scraping out a bowl. Given the choice, I'd pick one of these guys before an old-fashioned wooden spoon any day (which again, is not to say there's not a time and place for wooden spoons.)

4. Knives: Your knives are really important tools. If you're spending $$ on anything in your kitchen, go for quality knives. Even if you have a smaller budget, buy the best you can afford. I've pictured a midrange santoku knife and an inexpensive paring knife here. The Kuhn Rikon knives are incredibly affordable but also incredible tools. For $15, you can buy yourself a very, very sharp carbon steel knife that stays sharp for quite a while. I have three of these paring knives and one of their small chef's knives (I like the colors, haha) and I wouldn't hesitate to give them as a gift (or buy more) at any time.

The most important thing regarding your knives is sharpness. There's no use in buying top-of-the-line knives and then letting them go dull. If you don't know how to sharpen your knives, there are many resources on the Internet to teach you. Otherwise, you should be able to get them sharpened at a hardware store, a knife store, or through the knife manufacturer. Dull knives cause way more damage than sharp knives. Keep that in mind if you think you're afraid of working with sharp blades.

Next are tools that aren't necessarily essential, but I sure like having around. 

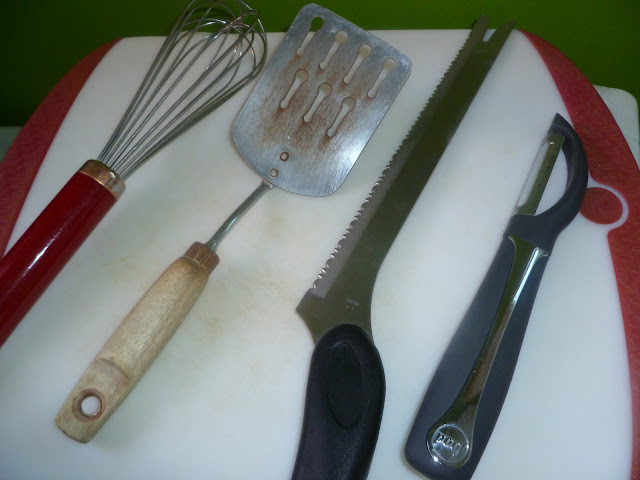
1. Whisk: Great tool to have when you're using really anything that includes flour and a thin batter. Whisks get lumps out like no other.

2. Spatula: I love these old spatulas--I don't even know where we got them from. They fit well in the hand and have a short enough handle where they're easy to control. The perfect pancake-or-grilled-cheese flipper.

3: A serrated knife: If you've ever tried to cut bread with a plain bladed knife, you'll know why these guys are on the list! A quality, sharp serrated knife is a valued kitchen tool in any kitchen.

4. Vegetable peelers: Even with nice paring knives, I will never disparage the use of a quality vegetable peeler. One of these can peel a potato much better than I could with just a knife!

Finally, here are some tools that I love having around but don't use on a regular basis.

1. Digital Thermometer: This has been handy for things like making caramel or cooking chickens, but doesn't have an everyday use in my kitchen. But it's cool and fun to use!

2. Silicone bands: I saw these at our local cooking store for ... well, forever, and wanted them but never bought them. But I thought about them every time I cooked a chicken! I finally broke down and spent the $5, and have since loved every second of their presence in my kitchen.

3. Mortar and Pestle: I never thought I would need one of these. Then my nice peppermill broke and I couldn't afford to replace it right away. This little guy was my savior. It's easy to care for, small so it fits in my kitchen, and relatively easy to use (once you get a crushing technique down.) Having a backup in the kitchen is always a good thing!

4. Microplane: I love this baby. I put off buying one for years and used a grating tool instead. I'm sorry I waited. This microplane makes quick and efficient work of nutmeg, citrus zest, and cheese.

5. Tongs: Okay, maybe I should have put tongs with the last group. But I kind of thought, well, the spatula is here, so ... but I love my tongs and use them all the time. Just make sure you buy long-enough tongs that keep your hand away from the heat! Short tongs = useless.

6. Ice Cream Scoop: I know, sort of silly looking ... but you'd be amazed at how great this thing is for making sure you get nice, even portions. I use them to make things in muffin tins (like my Honey-Pepper Cornbread or Streusal-Topped Peach Muffins), and I also like them for making drop cookies (do I have no cookie recipes posted?? Looks like I'll need to remedy that!) They get you evenly-sized muffins or cookies that look like they were made by a professional. I recommend buying metal scoops--plastic scoops just don't work as well (I have two! Both are not that great).

Anyway, there you have it. Some basic kitchen tools!

Are there any kitchen tools that you love to use that aren't listed here? What are they? I'd love to know!

Friday, September 24, 2010

Honey-Pepper Cornbread

Have you ever been out to eat and seen cornbread on the menu? If you're like me, you get excited for it. A sweet, warm, corny muffin dripping with butter and honey ...

... and then it comes and I'm completely disappointed. I don't think I've had cornbread at any restaurant that I've really liked. Usually it's been baked with a muffin liner, and crumbles to bits when you pick it up. Sometimes you can nibble the top, but that's only 1/3 of the entire muffin!

Well, there's no need to be disappointed any longer!

Before you start mixing any ingredients, you'll want to get your pan ready. Pouring batter into a hot pan will ensure your cornbrad gets a nice crisp crust to the outside.

Today I'm using a muffin tin, but this recipe also makes enough to fill an 8x8 cake pan.

Oil the pan really well, and then pop it in your preheated oven.

Now that your pan is ready, you can start mixing your batter. It starts with melted butter, sugar, and honey.

I used half sugar and half honey, but it can be made with all sugar or all honey. The honey gives it a nice sweet-but-not-too-sweet flavor, I think.
Next crack in two eggs. Make sure your melted butter mixture isn't too hot or it will cook your eggs a little, and you don't want that.

Next comes the buttermilk. Yum, buttermilk.

Before you stir the buttermilk around, sprinkle in some baking soda too.

Now you can give your batter a swirl.

The dry ingredients are next. It's flour, cornmeal, and salt. And freshly-cracked black pepper. Lots of it.

I wish you could smell this.

Carefully pull your hot pan out of the oven and pour in your batter.

I find an ice cream scoop produces nice, even muffins.

Now just put them back in the oven and let them bake to a golden brown.


Slather 'em with butter and say sayonara to those dry, crumbly muffins you're used to!

If for whatever reason you end up with leftovers, they make a great cornbread stuffing. They also make a good breakfast. My hubby likes to warm them in the microwave, slather them with butter, and drizzle honey over the top. :D


Recipe: Honey-Pepper Cornbread

1 stick (1/4 lb.) butter, melted
1/3 c. sugar
1/3 c. honey
2 eggs
1 c. buttermilk
1/2 tsp. baking soda
1 c. cornmeal
1 c. flour
1 tsp. freshly cracked black pepper
1/2 tsp. salt

Grease a 8x8 cake pan or a muffin tin. Place in a preheated 375F oven and let it heat up while you prepare the batter.

Stir melted butter, sugar, and honey together. Add eggs; stir to combine. Add bbaking soda; stir to combine.

Add cornmeal, flour, pepper, and salt. Stir gently until all dry ingredients have been completely incorporated.

Take pan or muffin tin out of oven. Pour in batter (filling muffin tins 3/4 full.) Bake for 30-40 minutes or until completely cooked through. Let cool slightly before serving.